
When I was starting out making Scrapbooking kits, I always wondered what
a template was and how you used it. I always saw these gray pages and thought that looked so unappealing! But now that I know what they are used for and how you use them, it makes so much sense and can be very convenient to use. So I wanted to share a very simple tutorial on how to make and use a template and give it to you as a freebie!
This can be used the same way for quick pages, brag book pages or element templates. I'm doing a 4x6 brag book page for this simple tutorial.
FREEBIE CAN BE DOWNLOADED AT THE END OF THIS TUTORIAL
Step 1
Start out with a new file 6" Wide x 4" high (or 1800 pixels x 1200 pixels)
Add a shape or any element you want to use. I've just added a simple dark gray rectangle off to the left side for this tutorial. You can see it goes on top of the background layer.
Start out with a new file 6" Wide x 4" high (or 1800 pixels x 1200 pixels)
Add a shape or any element you want to use. I've just added a simple dark gray rectangle off to the left side for this tutorial. You can see it goes on top of the background layer.
 Step 2
Add any other shape or element to your page. I added a zig zag line in a light gray color for this tutorial as a type of border. Make sure this layer is on top of the dark gray rectangle layer.
 Step 3
Add a square/rectangle to the background. This will be the paper for the background of your page. I made this a lighter gray to stand out from the other gray colors. Make sure this layer is on the very bottom of the other two layers.
 Step 4
Use your eraser tool and pick a shape to cut out for your photo. I used a size 906 circle for this tutorial. Make sure you have it on the layer that you want to use your eraser tool on and cut out your shape. That is a basic tutorial on how to make a template. You can add as many layers as you'd like to get the layout your looking for.

HOW TO USE YOUR TEMPLATE
Step 1
Open your "paper" file. Drag it down to the template our working with.
Open your "paper" file. Drag it down to the template our working with.

Step 2
Make sure your paper layer is on top of the layer your putting it on. In this tutorial I'm putting it on top of the last square background layer with the hole cut in it.
Make sure your paper layer is on top of the layer your putting it on. In this tutorial I'm putting it on top of the last square background layer with the hole cut in it.

Step 3
With your paper layer selected, press and hold down "Ctrl G" to make the paper layer adhere to the bottom layer and form around the circle.
With your paper layer selected, press and hold down "Ctrl G" to make the paper layer adhere to the bottom layer and form around the circle.

Step 4
Highlight the paper layer and the shape layer your working with. Right click when both are highlighted and click "Merge Layers" so you merge the paper layer and your shape layer.
You will do this "Merge layers" step everytime you add paper to a layer.
Highlight the paper layer and the shape layer your working with. Right click when both are highlighted and click "Merge Layers" so you merge the paper layer and your shape layer.
You will do this "Merge layers" step everytime you add paper to a layer.
 Step 5
For this part I just added some color to the larger rectangle shape using the "Paint Bucket" tool.
I took the "Eyedropper" tool to the paper so I could get a good match in color and then dropped the color in. You could also follow the step above to add another paper if you wanted.
 You can add texture to this shape if you'd like as well in this step.
Step 6
You can add other embellishments, colors and textures at this point to finish it off.
You can add other embellishments, colors and textures at this point to finish it off.

Step 7
Hide the background by clicking the eye on that layer. Merge all visible layers and save as a PNG file. You can then open it later and add your photo's!

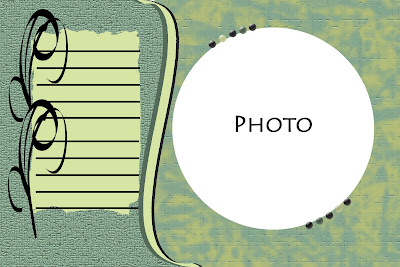
I changed my final version up a bit from the tutorial. I replaced the zig zag border with a scroll type border. Just to show you other options for making a template.
So click HERE to snag the 4x6 brag page shown above!


No comments:
Post a Comment