I've been asked about how to make digital stitching in Photoshop. Like most tutorials, there are many ways to create stitching and everyone may find ways to adapt tutorials to work for them. This is a basic tutorial for a straight stitch. You can take these steps and adapt them to different shapes (hearts, circles, etc) to get different stitching shapes. You can also download brushes that are the easiest way to get a stitch. I will talk about that at the end of this tutorial.
Step 1
Open a new background. I used 12" x 12" (3600 pixels x 3600 pixels)
for this tutorial because that is the size used for scrapbooking pages.
Choose the rectangle OR line tool to start.
for this tutorial because that is the size used for scrapbooking pages.
Choose the rectangle OR line tool to start.
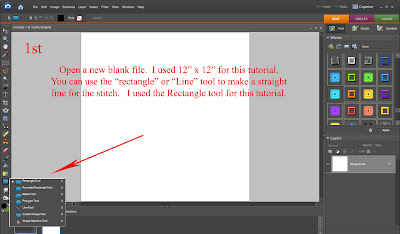 Step 2
Draw a line with your tool. Width of the line doesn't matter, it just depends on the look your going for with your stitch.
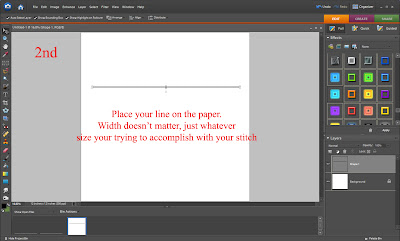
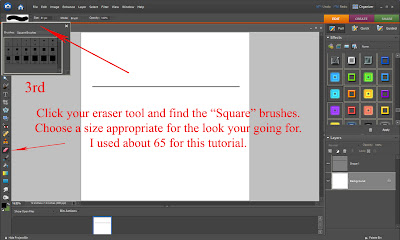
Step 3
Click your eraser tool and find the square brushes. Choose a size appropriate for the look your going for with your stitch. I used about size 65 for this tutorial (which is on a 12x12" background)
Click your eraser tool and find the square brushes. Choose a size appropriate for the look your going for with your stitch. I used about size 65 for this tutorial (which is on a 12x12" background)
 Step 4
Erase parts of the line that you've created randomly. They can be close together, far apart, some larger than others... symmetric or not symmetric. Again, it depends on what look your trying to achieve with your stitch.
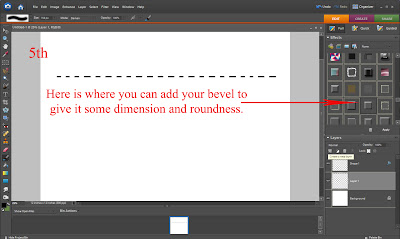 Step 6
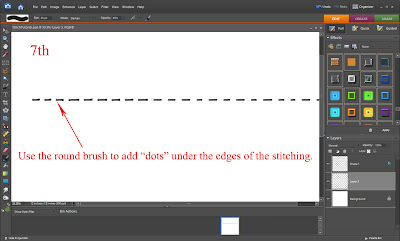
Time to add some stitching holes.
Make sure you have a new layer BELOW the stitch layer. Choose the default round brushes. You will see a solid round circle brush OR a blurred circle brush. I used the solid brush approx size 35 for this tutorial, but you can choose the more blurred brush so you get a different look. You'll see that blurred brush used in the "STAPLE" photo I've included farther down this post.
Also choose your color for the "holes". I just used a dark gray.
 Step 8
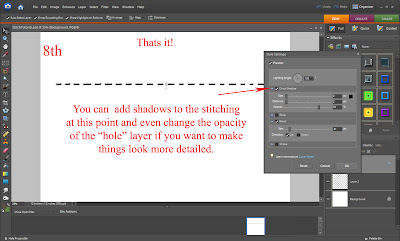
 You can add shadows to the stitching at this point and even change the opacity of the "hole" layer if you would like to change the look. That's all there is too it! Take out the background layer, crop it to make it smaller and save as a PNG file to use later.
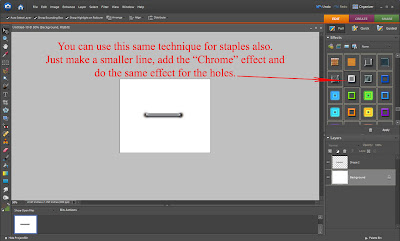
You can achieve the same look with the holes when you make a staple. For these holes I used the more "blurred" round brush as stated in step 6. Just draw a line and add the Chrome effect or any metal effect, depending on what type of staple you want to make. Then add the shadow holes on a layer under the staple.
Stitching Brushes
You can also download a stitching brushes which are so much easier to use. You just add it to your program, select the "stitch" you want from your brush list, click your mouse button and hold it down while you drag your "stitch". You can make different shapes this way also.
You can also download a stitching brushes which are so much easier to use. You just add it to your program, select the "stitch" you want from your brush list, click your mouse button and hold it down while you drag your "stitch". You can make different shapes this way also.
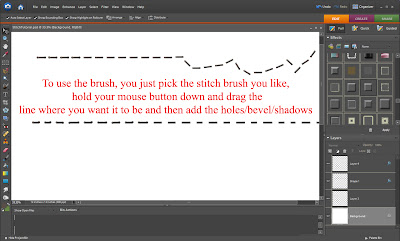
Here is a great link to get some Photoshop Stitching Brushes. It says it was made for Photoshop CS, but I have Photoshop Elements 6.0 and it worked just fine for me.
PhotoShop Stitching Brushes by Aneesah at DeviantART
You can also google "stitching brushes for __________" whatever program you use and something usually comes up!
Questions about this tutorial? Want to see another tutorial? Just contact me with the button at the top of my blog! Hope this helps someone!



No comments:
Post a Comment